Iphone 13 Late Setup Walk Through

Unveiling the Magic of Iphone 13 Late Setup Walk Through with Stunning Visuals

iPhone 13 Late Setup Walk Through: A Comprehensive Guide

Table of Contents

iPhone 13 Late Setup Walk Through: A Comprehensive Guide

If you're reading this, it's likely that you've newly acquired an iPhone 13 or plan to upgrade to one soon. If you're experiencing issues during the setup process, you're not alone. This guide will walk you through the latest setup options for iPhone 13 and provide tips for a seamless transfer of data.

Setup Options

When you turn on your new iPhone 13, you'll be greeted with the "Hello" screen. From here, you'll have three options to choose from: * Restore from iCloud or iTunes
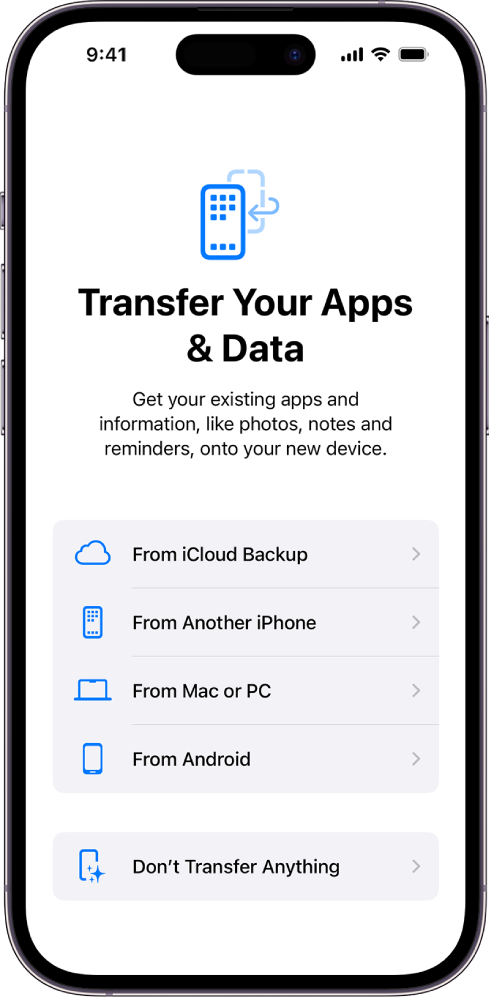
Iphone 13 Late Setup Walk Through
: If you're restoring data from a backup, this is the way to go. Connect your iPhone 13 to a Wi-Fi network, select "Restore from iCloud or iTunes," and follow the prompts to restore your data. * Transfer data from Android: If you're switching from an Android device, Apple offers a convenient transfer option. With the transfer feature, you'll be able to transfer photos, messages, contacts, and other data from your old Android device to your new iPhone 13. * Setup as new iPhone: If you're new to the iPhone ecosystem or don't want to transfer data from another device, you can simply setup your iPhone 13 as new.

Restoring from iCloud or iTunes

restoring from iCloud or iTunes is a relatively straightforward process. To start, make sure your iPhone 13 is connected to a Wi-Fi network. Then: * Tap on "Restore from iCloud or iTunes" and select "Restore from iCloud." * Enter your Apple ID and password to log in to iCloud. * Select the backup you want to restore from, making sure it's the correct one for your iPhone 13. * Wait for the restore process to complete, which can take several minutes depending on the size of the backup.

Transferring Data from Android Transferring data from Android to iPhone 13 is a relatively new feature offered by Apple, and it's available through the Quick Start app. One thing, you'll need a stable internet connection and a cable to connect the devices. Here's how it's done: * Open the Quick Start app on your iPhone 13 and tap on "Transfer Data from Android." * Make sure your Android device is nearby and has the Quick Start app installed. * Follow the prompts to start the transfer process. * Transfer photos, messages, and other data should only take a few minutes to complete.

Setup Process Details

Here's a step-by-step guide to setting up your new iPhone 13: * Turn on your iPhone 13 and select your language and country. * Follow the on-screen instructions to select your Wi-Fi network and set up Face ID if you choose not to use it then, with Face ID enabled, Tap on "Don't Use Face ID." * Create your Apple ID or sign in with an existing email address and password. * Since FaceID setup, you can add a new user but you can't log out or delete the saved data. * An Apple one then you set up with a device, and to repair it, a manual reset with option.

Gallery Photos

Related Topics

Used Electric Motorcycles For SaleSocial Media Security Solutions For Small BusinessCracked Screen Repair For Iphone 13Llc California TaxesCat Matted Hair Removal For Cats With Coat ProblemsMicro-InteractionsHyperconnectivity In The Automotive IndustryGetting A Job In Sales IndustryProtecting Your Identity On The Dark WebHow To Mix Ibuprofen And Tylenol And WineElectric Motorcycle Skid Plate OptionsWater Damage Repair For PhoneHow To Start A Mobile Pet Grooming Business With A Beauty PartnershipHot Dog Nutrition Facts For Pregnant WomenCar Wheel Changing ProcessLearn To Draw Facial ExpressionsAlexa Setup And Connection To A Home NetworkFamily Screen Time AgreementIncreasing Awareness Of PhubbingProtect Internet From Hacking Through RouterCoastal Interior Design For Beach Houses
📜 DMCA ✉️ Contact 🔒 Privacy ©️ Copyright