Writing a Check for a Loan: A Step-by-Step Guide
When it comes to paying off a loan, writing a check can be a simple and effective way to make a payment. However, the process can be unfamiliar to those who don't write checks regularly. In this article, we'll walk you through the steps to writing a check for a loan, including the necessary information you'll need to provide and some tips to keep in mind.
What is a Loan Agreement?
A loan agreement is a legal document between a creditor and a borrower that outlines the terms of the loan, including the amount borrowed, interest rate, repayment schedule, and any security or collateral involved. It's essential to understand the terms of your loan agreement before writing a check to ensure you're making the correct payment amount and on time.
Step 1: Gather the Necessary Information
Before writing a check for a loan, you'll need to gather the following information:
- Loan agreement: Review the loan agreement to ensure you understand the terms and the payment amount.
- Loan amount: Determine the total amount you need to pay, including any interest or fees.
- Payment date: Choose a payment date that suits you, ensuring it's before the due date specified in the loan agreement.
- Payee's name and address: The loan agreement will specify the payee's name and address, which you'll need to include on the check.
Step 2: Fill Out the Check Header
The check header includes the essential information about the check:
- Payee's name: Write the payee's name on the line "Pay to the order of."
- Payee's address: Include the payee's address, if required.
- Check number: Assign a unique check number, which can help track your payments.
- Date: Write the date on the "Date" line, which should be the same as the payment date.
Step 3: Write the Loan Amount
On the line marked "Dollar" (or "$"), write the loan amount, including any interest or fees. Make sure to include the decimal point, as is standard with US currency.
Example: If the loan amount is $1,000, write "10.00" in the dollar box, with the decimal point separating the dollar amount from the cent amount.
Step 4: Add the Memo Line (Optional)
The memo line is an optional field where you can include a brief description of the payment. This can help you keep track of your payments and provide context for any future reference.
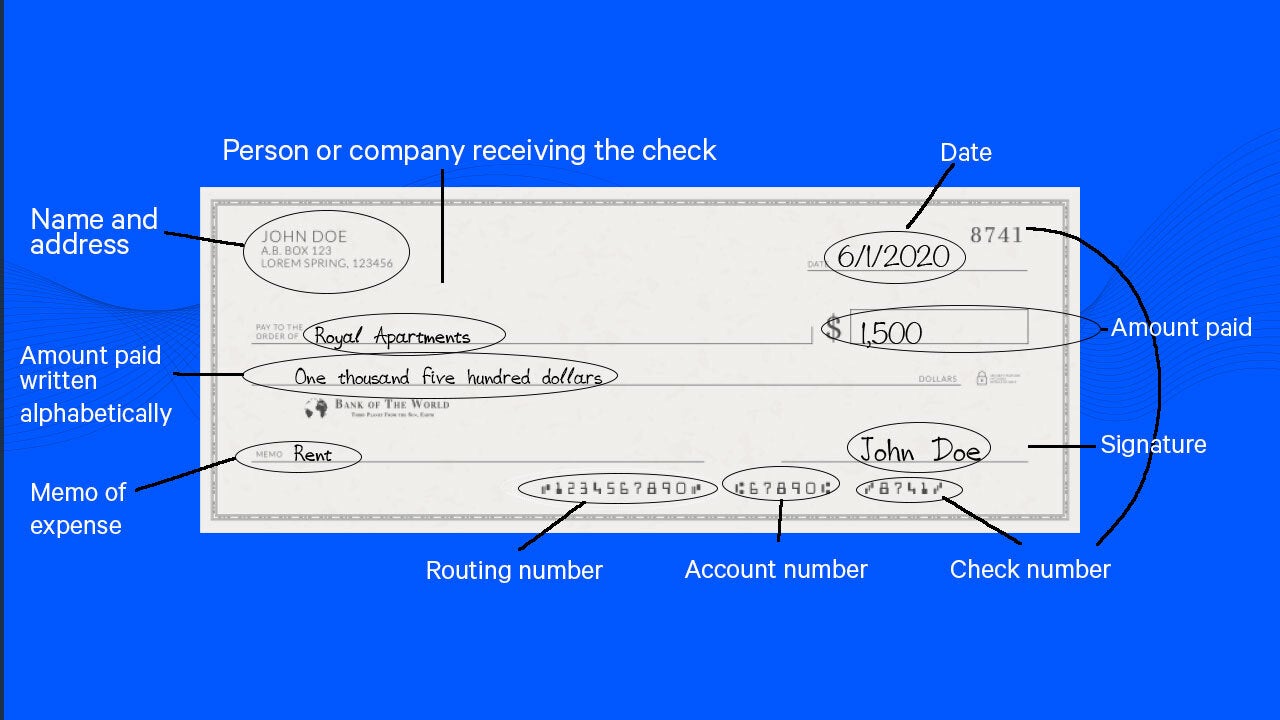
Step 5: Sign the Check
Sign the check in the presence of a witness, as required by the Uniform Commercial Code (UCC). This step is crucial, as it helps prevent check tampering and ensures the payment is valid.
Step 6: Keep a Record of the Payment
After writing and signing the check, keep a record of the payment in case of any disputes or issues with payment verification. This can help protect you in case of a discrepancy or lack of payment confirmation.
Alternative Payment Methods
While writing a check is a traditional method for making loan payments, there are alternative methods available, including:
- Electronic banking: Many loan agreements and fintech companies offer electronic banking options, allowing you to make payments online or through a mobile app.
Conclusion
Writing a check for a loan can seem daunting, especially if you're unfamiliar with the process. However, by following these steps and understanding the necessary information, you can make a secure and on-time payment. Remember to keep a record of the payment and explore alternative payment methods if they suit your needs better.
Additional Resources
Diagram of a Check (Image)
</h4>
<p><iframe width= "How to Write a Check: A Step-by-Step Guide")
Remember, writing a check for a loan requires attention to detail and a thorough understanding of the loan agreement and payment terms. By following these steps and exploring alternative payment methods, you can make a secure and on-time payment that helps you manage your finances effectively.


 - wikiHow")


